If you try to run the command sudo apt install postgresql in Ubuntu it will install Postgresql version 14 instead of version 15. As of writing the Ubuntu repository does not include version 15.
Follow the tutorial below for a detailed guide to successfully installing PostgreSQL 15.
Step-by-Step Instructions on Configuring Postgresql 15 in Ubuntu
The following steps were tested in Ubuntu 22.04 LTS. If there are new versions of Ubuntu, I will test the steps again and update this post.
1. Installation
1.1 Add the Postgresql Package Repository to Ubuntu
Run the commands below to add the official Postgresql package repository to Ubuntu.
# Create the file repository configuration
$ sudo sh -c 'echo "deb http://apt.postgresql.org/pub/repos/apt $(lsb_release -cs)-pgdg main" > /etc/apt/sources.list.d/pgdg.list'

# Import the repository signing key
$ wget --quiet -O - https://www.postgresql.org/media/keys/ACCC4CF8.asc | sudo tee /etc/apt/trusted.gpg.d/pgdg.asc &>/dev/null

# Update list of available packages
$ sudo apt update
1.2 Install Postgresql 15 Server and Client
Run the command below to install PostgreSQL 15 Server and Client.
$ sudo apt install postgresql-15 postgresql-client-15 -y1.3 Verify installed PostgreSQL version
Run the command below to check if PostgreSQL has successfully been installed and if the PostgreSQL version 15 has been installed.
$ psql --versionOutput

1.4 Verify if PostgreSQL is running
Run the command below to check the status of PostgreSQL.
$ sudo systemctl status postgresqlThe output would look like this if PostgreSQL is running.

Ff the PostgreSQL is not running, the output will be like below.

If PostgreSQL is not running, then running the command below will start it.
$ sudo systemctl start postgresqlThe command above does not have an output, so it will be better to check the status by running the command sudo systemctl status postgresql.
1.5 Making PostgreSQL automatically run after reboot
To make sure that PostgreSQL will run after a restart or when you turn on your Ubuntu server/computer, then run the command below.
$ sudo systemctl enable postgresqlOutput.

To check whether PostgreSQL will run at restart run the following command.
$ sudo systemctl is-enabled postgresqlOutput.

If the output is enabled then PostgreSQL database will run at reboot.
If disabled, then it will not automatically run. You should run the command sudo systemctl enable postgresl to automatically start PostgreSQL upon boot.
Note: By experience, PostgreSQL is already running and will start upon starting of Ubuntu once I have finished installing it.
2. Configure PostgreSQL 15
2.1 Change Ubuntu User to PostgreSQL admin
sudo -u postgres psql2.2 Update PostgreSQL Admin User Password
ALTER USER postgres WITH ENCRYPTED PASSWORD '[adminPassword]';2.3 Create a new user in PostgreSQL
This user will be used by your application to access the database.
CREATE USER [Username] WITH ENCRYPTED PASSWORD '[Password]';2.4 Create a new database
CREATE DATABASE [DatabaseName];2.5 Grant user privileges to the database
GRANT ALL PRIVILEGES ON DATABASE [DatabaseName] TO [Username];2.5 Connect to the database
\connect [DatabaseName];2.6 Create a schema and authorize the user to use it.
CREATE SCHEMA [SchemaName] AUTHORIZATION [Username];Note: Before PostgreSQL 15, the public schema is accessible to any user by default. But starting PostgreSQL 15, they disallow default access to the public schema due to security risks.
This step to create a schema and authorize the user to use it is necessary since we are using PostgreSQL 15.
2.7 Exit psql
\q2.8 Test user login to PostgreSQL
psql -U [Username]-d [DatbaseName] -h localhostThis will ask you for your password.
If you were able to login without errors, you have successfully created your PostgreSQL database and user.
3. Allowing access to PostgreSQL from outside Ubuntu machine
If you need remote access to your PostgreSQL from outside of your Ubuntu machine, then you will have to follow the steps below.
By default, PostgreSQL only allows connection from localhost only.
3.1 Allow PostgreSQL to listen to connections from anywhere
Open the PostgreSQL configuration file in an editor.
Below I will be using vim, but you can use what you are comfortable with like nano or something else.
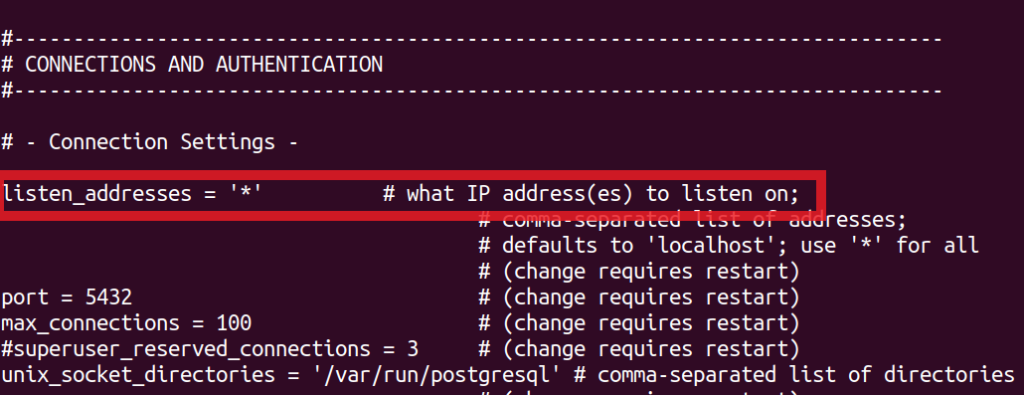
sudo vi /etc/postgresql/15/main/postgresql.confUncomment the line under Connection Settings that says listen_address by removing the number sign (#) sign.

Save and exit by pressing :wq then enter.
3.2 Allow login to PostgreSQL via IPv4 remote connection from anywhere
Open the PostgreSQL Host-Based Authentication (HBA) file.
sudo vi /etc/postgresql/15/main/pg_hba.confGo to the line under IPv4 local connections and change 127.0.0.1/32 to 0.0.0.0/0.

Save and exit by pressing :wq then enter.
Note: Allowing access from anywhere (0.0.0.0/0) is not really recommended security-wise. If you want to limit access from a specific subnet or CIDR address range the address range, like 192.168.0.0/24, instead of 0.0.0.0/0.
I only placed 0.0.0.0/0 since this is only my test server and I’m lazy to check which IP address range my Ubuntu machine is.
3.3 Allow TCP 5432 port in Ubuntu Firewall
If Ubuntu firewall is enabled you will need to allow the default PostgreSQL 5432 port to allow TCP connection.
To do that, run the command below.
sudo ufw allow 5432/tcp3.4 Connect to PostgreSQL remotely to check
On a different machine in your network, connect to your PostgreSQL server.
Here’s the command via psql.
psql -U [Username]-d [DatbaseName] -h localhostYou can also try connecting using pgAdmin4 or other database clients if you want.
We hope this helps you install PostgreSQL 15 in your Ubuntu.
If you have any issues or comments installing, let us know in the comments below.