If you looked inside an Arduino Library you would see filename extensions such as .h and .cpp, which makes us conclude that the Arduino IDE uses C++ for its codes. If you look inside those files most of the Arduino Libraries have C++ classes inside of them. The question now is: Can you use C++ Classes in Arduino IDE without Creating a Library?
The answer to that is YES!
It is a bit tricky as there are rules you need to follow. I shall dive into that later.
Sample Code
Below is a short Arduino Code with a C++ Class without using a Library.
#define PIN_LED1 3
#define PIN_LED2 4
#define PIN_LED3 5
#define PIN_LED4 6
/*
* BLINKER CLASS DEFINITION
*/
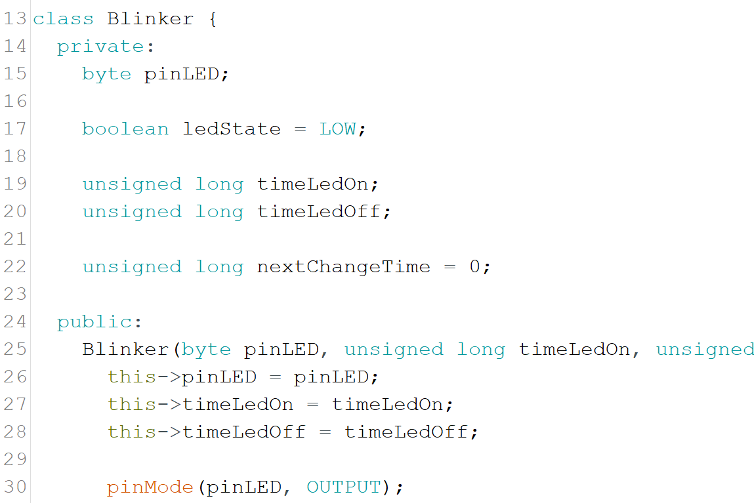
class Blinker {
private:
byte pinLED;
boolean ledState = LOW;
unsigned long timeLedOn;
unsigned long timeLedOff;
unsigned long nextChangeTime = 0;
public:
Blinker(byte pinLED, unsigned long timeLedOn, unsigned long timeLedOff) {
this->pinLED = pinLED;
this->timeLedOn = timeLedOn;
this->timeLedOff = timeLedOff;
pinMode(pinLED, OUTPUT);
}
// Checks whether it is time to turn on or off the LED.
void check() {
unsigned long currentTime = millis();
if(currentTime >= nextChangeTime) {
if(ledState) {
// LED is currently turned On. Turn Off LED.
ledState = LOW;
nextChangeTime = currentTime + timeLedOff;
}
else{
// LED is currently turned Off. Turn On LED.
ledState = HIGH;
nextChangeTime = currentTime + timeLedOn;
}
digitalWrite(pinLED, ledState);
}
}
};
/*
* BLINKER CLASS VARIABLES DECLARATION
*/
Blinker blink1 = Blinker(PIN_LED1, 500, 500);
Blinker blink2 = Blinker(PIN_LED2, 1000, 1000);
Blinker blink3 = Blinker(PIN_LED3, 2000, 2000);
Blinker blink4 = Blinker(PIN_LED4, 1000, 2000);
void setup() {
}
void loop() {
blink1.check();
blink2.check();
blink3.check();
blink4.check();
}Okay, I admit that was not very short. At least you can see that I have used a C++ Class without creating a library. You can compile it in your Arduino IDE if you still do not believe me. You can see the Circuit Diagram somewhere below, there is also a Fritzing Diagram if you want to seriously test it.
You can check the code in my Github here.
What the code does is almost the same as the Blink Code (File >> Examples >> 01.Basics >> Blink) but what it does differently is that it lets you Blink many LEDs with different On and Off times simultaneously.
I will not tell you how to create C++ Classes in this post, I shall write another post about it, but I will point out some rules you need to follow for your C++ Classes to compile properly in the Arduino IDE.
2 Rules to follow when using Classes in Arduino IDE
1. Class Definitions must be done before using the Class as a variable.
Unlike functions, you cannot define a Class after you use it. Functions can, but classes cannot.
This will NOT compile. (Github differentBlinkersNonCompileExample1)
- setup()
- loop() – uses a variable of Class Blinker to access a class function.
- Definiton of Class linker
- Variable declaration of Class Blink
This will throw the error: differentBlinkers:19: error: ‘blink1’ was not declared in this scope
Nor will this compile. (Github differentBlinkersNonCompileExample2)
- Variable declaration of Class Blinker
- setup()
- loop() – uses a variable of Class Blinker to access a class function
- Definition of Class Blinker
This will throw the error: differentBlinkers:14: error: ‘blink1’ does not name a type
The correct sequence should be like this.
- Definition of Class Blinker
- Variable declaration of Class Blinker
- setup()
- loop() – uses a variable of Class Blinker to access a class function
2. Using Tabs is possible
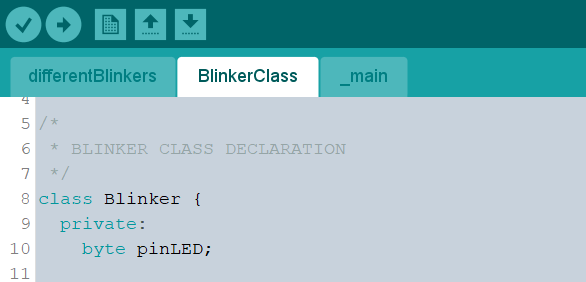
I have been experimenting with Arduino IDE Tabs and noticed that it compiles in the order of Left to Right.
Github Code – differentBlinkersTab.
What that means is that the Arduino IDE will compile the tabs on the above photo in the order of
| differentBlinkers | First to be compiled |
| BlinkerClass | Second to be compiled |
| _main | Last to be compiled |
What I do is that I put my setup and loop function on the _main. I use specifically the underscore (_) in the tab name so that it would be forced to go to the rightmost side of the tab list. This is also where I declare variables where I use my defined class.
If the Class Definition is made on the tab to the right of where the setup or loop function is located (or where the Class Variables are declared and used) the compile will fail.
Those are the two rules that I find that limits the usage of Classes in the Arduino IDE without creating a library.
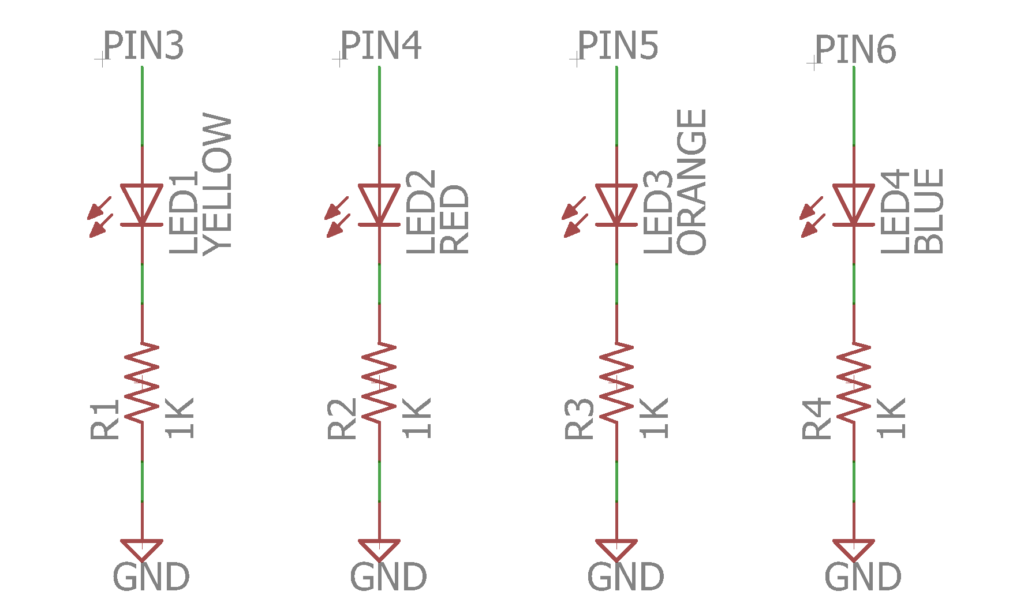
Below is the diagrams for you to test the code that I have done. There is also a video that the program is working.
Circuit Diagram
Fritzing Diagram

Hallo,
Thanks for the nice class solution, I copied your sketch and it is working fine. I like to modify the times “ON” and “OFF” which are fixed now in the initiate statements:
Blinker blink1 = Blinker(PIN_LED1, 500, 500);
Blinker blink2 = Blinker(PIN_LED2, 1000, 1000);
Blinker blink3 = Blinker(PIN_LED3, 2000, 2000);
Blinker blink4 = Blinker(PIN_LED4, 1000, 2000);
My intention is to modify these times through a “mqtt publish message”, so I have to give the blink1.check() statement the parameters of the “ON” and “OFF” times. The PIN_LED1 can be an integer because it is a fixed address belonging to blink1 instance.
I tried a lot but did not succeed, often I had the compile message:
‘ no matching function for call to ‘Blinker::check(…….)’
Are you able to help me out to solve this question,.
Thanks in advance for your reply
best regards
Piet Deen
Hey Piet, glad to have helped you over email. I hope your project is doing well.
Thank you very much for your post. I just wanted to let you know that it help me a lot. However – I could not make it work when I tried to combine you setup where you keep methods in helper files. Any experience with that combination?
Hi Joachim, if I understood your questions correctly. Try putting the definition of your Class on the leftmost tab.
Put your setup() and loop() function on the rightmost tab.
Arduino compiles the tabs from Left to Right.
Hi. I have not yet tried to compile for arduino, but regarding instantiation before having a class definition – that’s an expected c++ behavior. You cannot create or use a class object or use its member functions before you define them. However, you still can create a pointer of a class type, having a forward declaration for your class beforehand.
The reason I am ponting that out is that you mention it as a “arduino-related” rulles for using classes, but this rules are general for the C++ itself.
Hi Sergey, thank you for the additional information. I’m glad to have learned something. I will improve more on my C++ skills. ^_^
Thanks a bunch, it was exactly the little tutorial I was looking for.
But I did a little tweak.
By moving the nextChangeTime to public one can move the check to the main loop “if (currentTime > blink1.nextChangeTime) …” and just invoking the blink part when needed.
Removing quite a bit needless function call and wasted cycles 🙂
// anders
Hi Anders, that is a really good enhancement! Thank you for that. 🙂
Hi Anders, Thank you for the suggestion to improve efficiency.
Would you mind sharing the tweaked code? I don’t get it.
Thanks
Thank you for providing the example of Class.
You can keep your main code at the first tab and execute the other tabs in the order that you wish, without having to worry about the alphabetical order.
1) Name the main code with the extension .ino and the other tabs with the extension .h
2) From the main code, call the other tabs with #include
#include “Definitions.h”
#include “BlinkerClass.h”
etc.
The tabs will be executed in the same order that you #include them.
You can also use
#pragma once
at the beginning of the tabs to prevent double definitions
Thanks Manuel! Will try this in the future. 🙂
All the > in the sample code must be change to >.
Well that is html for you.
All the “>” must be a >
Can’t win
All the & g t ; must be changed to >
Thanks Graham! I already updated the article. 🙂
After Day’s of frustration with Arduino IDE file hierarchy THIS nailed it for me. That you very much !
Hello
How are you?
Many thanks for your great work.
And I´ve question:
What happends within the void check()-function if the millis()-function has a roll-over?
wbr Piet
I know, an old thread. Nevertheless somebody might stumble here so here goes;
Arduino IDE – the order of things
Had some issues compiling while using tabs, did not find a solution on ddg, experimented some and found this:
Tabs will be compiled alphabeticaly by name in the order of ASCII. Not all symbols are accepted (IDE 1.8.12)
– the sketches name is always the first tab, then
– numbers
– Uppercase
– underscore “_”
– lowercase
When changing the name of a tab, its place in the tabbar is not changed immediatly after saving the sketch, but it is (almost always. If not, close and reopen) after compiling. It is compiled in the correct order though.
When using a class within your sketch
– class defenition must be done before usage
– a function can be anywhere in the sketch
– class variable declaration must be done prior to SETUP and LOOP
So one could make use of this by naming the tabs
– “sketches name – comments”
– “A_classes”
– “B_setup – including class.vars declaration”
– “functions_1_loop”
– “functions_2”
– “functions_etc”
This makes the navigating trough your code with ctrl-tab easy as cake.
I noticed that you implemented a simple state machine in your example. A better way to implement a state machine, particularly for more complex problems, is to use pointers to state functions . At each state transition set the current state var to the pointer to the next state function. This avoids a lot of “iffy” case or if else code and lots of state flags.