After setting up an Active Directory (AD) on our Windows Server it is advisable to have another server to be a Secondary Active Directory Domain Controller to become the failover for Active Directory in case something happens to the first AD Server.
Below is a detailed tutorial on how to properly set up a Secondary Active Directory Domain Controller on Windows Server 2016.
Note
Primary refers to the first Windows Server that we setup Active Directory with.
Secondary refers to the the Second Windows Server we will set Active Directory. This is what we will setup here.
Here are the major steps that we need to do
Setup
- Primary: Get the IP Address of the Active Directory Domain Controller
- Secondary: Change the Computer Name of the Windows Server
- Secondary: Update the DNS Server Address
- Secondary: Install Active Directory Feature
- Secondary: Promote Server to a Domain Controller
- Secondary: Get the IP Address of the Active Directory Windows Server
- Primary: Update the DNS Server Address
Testing
- Secondary: Login using the Active Directory Administrator
- Secondary: Check Active Directory Users and Computers
- Secondary: Check DNS
Setup
Primary: Get the IP Address of the Primary Active Directory Domain Controller
Login to your Primary Active Directory Windows Server.
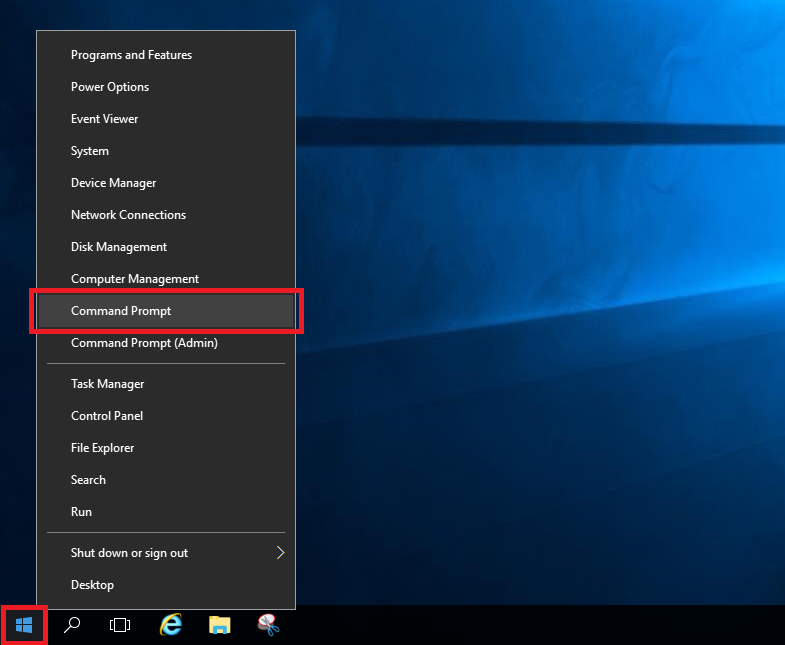
Right-click on the Window Icon on the bottom-left of the screen. Then click Command Prompt.
On the command prompt window type ipconfig then Enter.
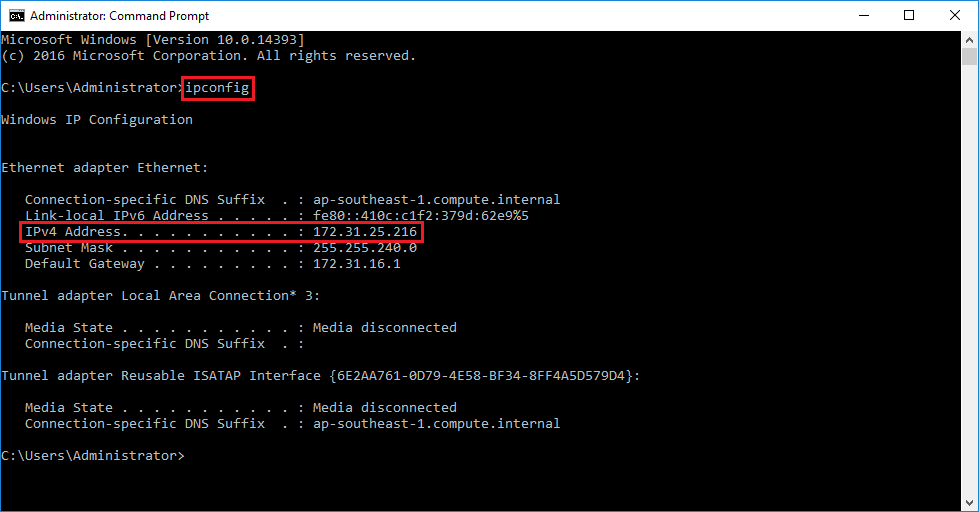
Note the IPv4 Address. You will need this later on the Secondary Windows Server.
In my case the IPv4 Address is 172.31.25.216. Yours would be different since you have a different network.
Once you have the IPv4 you may log out of the Primary AD Windows Server.
Secondary: Change the Computer Name of the Windows Server
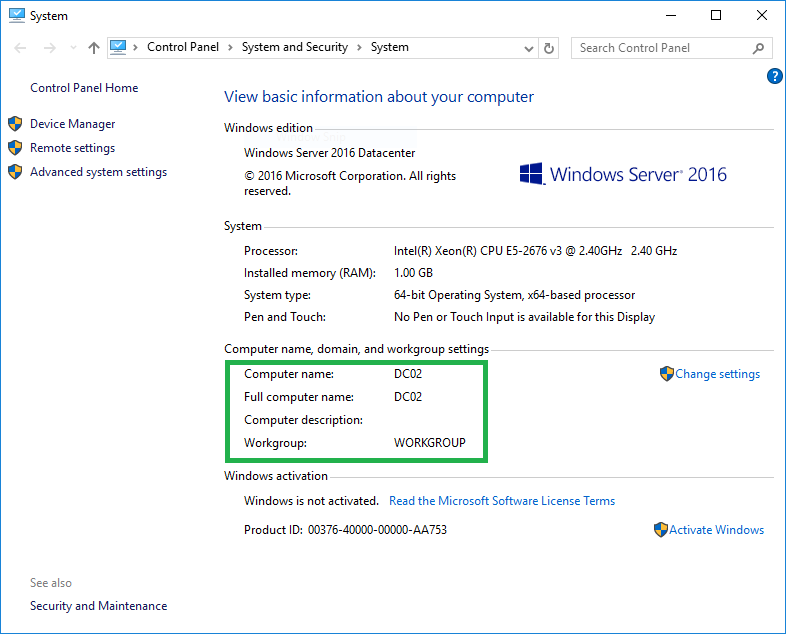
I renamed my Primary AD Windows Server as DC01 (Domain Controller 01). Since I are setting up a Secondary AD Windows Server I will name this as DC02 (Domain Controller 02). You may name your Windows Server whatever you want.
To change the Computer Name of your Secondary Windows Server follow the instructions on my post Changing the Computer Name of Windows Server 2016.
Secondary: Update the DNS Server Address
Now that we have updated the Computer Name of our Secondary Windows Server, we now need to point the DNS Server Address of this server to our Primary AD Windows Server. This is necessary if we want to be able to communicate with the Primary Server.
Right-click on the Window Icon on the bottom-left of the screen. Then click Network Connections.
![]()
Since my Secondary Windows Server is connected via Ethernet, my Network Connection is Ethernet. If you are connected to a WiFi, your Network Connection is Wi-Fi.
Since I am on Ethernet I shall use Ethernet as Network Connection. Adjust accordingly.
Right-click on Ethernet then click Properties.

Click on Internet Protocol Version 4 (TCP/IPv4), do not uncheck this. Then click Properties.
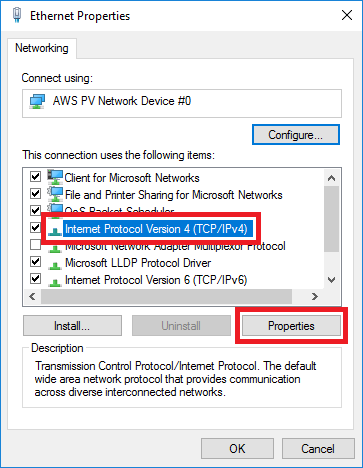
Click on the radion button Use the following DNS server addresses:.
Type the following.
Preferred DNS Server: IP Address of your Primary Active Directory Windows Server. Mine is 172.31.25.216. Yours would be different.
Alternate DNS Server: 127.0.0.1
Note: 127.0.0.1 means that this IP Address is pointing to itself . If you want to know more about 127.0.0.1 read this post.
Then click OK.
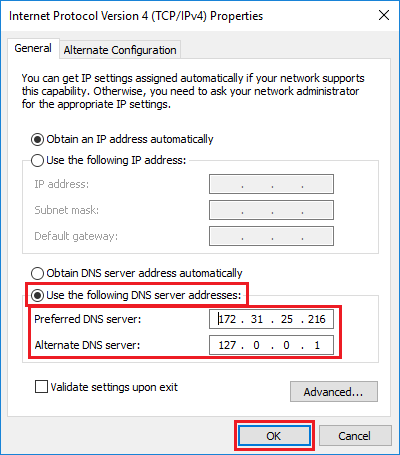
We have now succesfully updated our DNS Server Address.
You can close all the other windows and proceed with the next step.
Secondary: Install Active Directory Feature
This step is basically installing the Active Directory on our Secondary Windows Server. Very much the same step as the Primary AD Windows Server. This will defer when you get to Promoting Server to Domain Controller.
Click on Window Icon on the bottom-left. Then click Server Manager.
![]()
Click on Add roles and features.
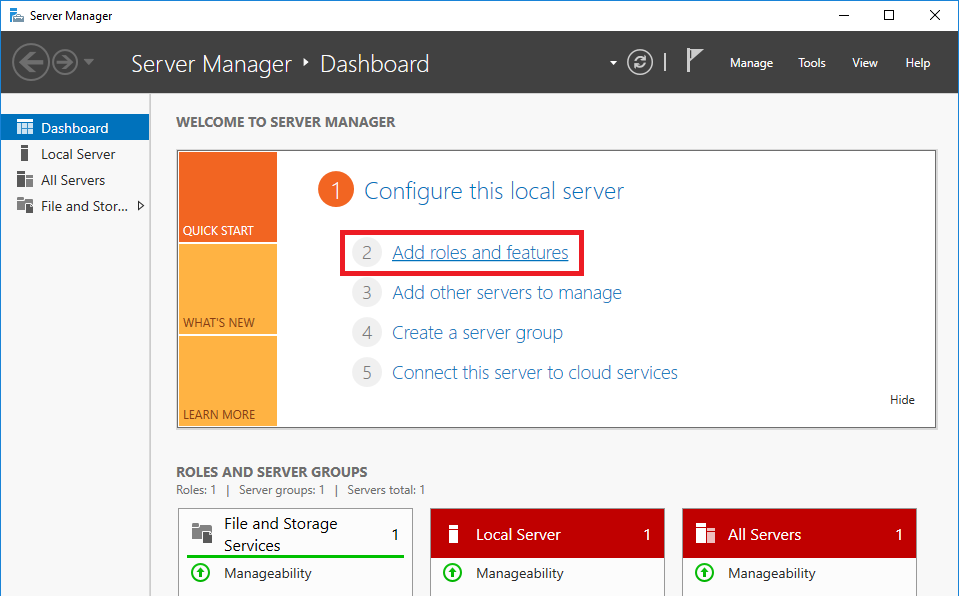
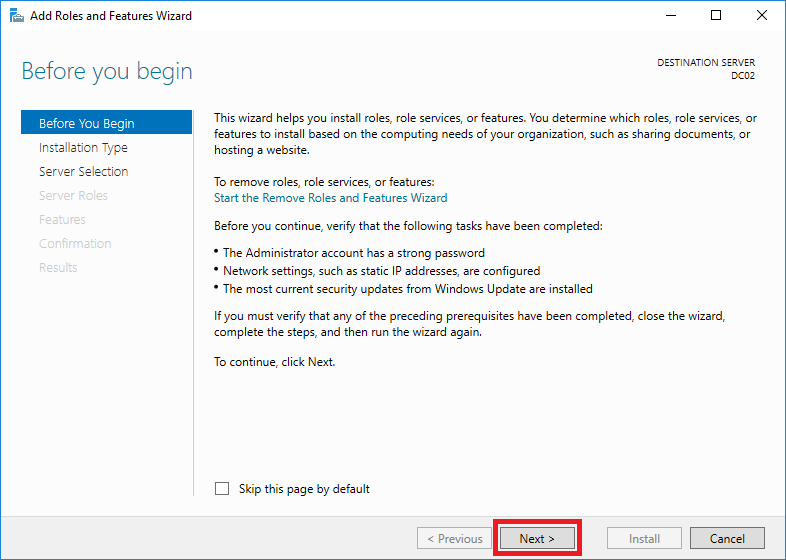
On the Add Roles and Features Wizard window click on Next.
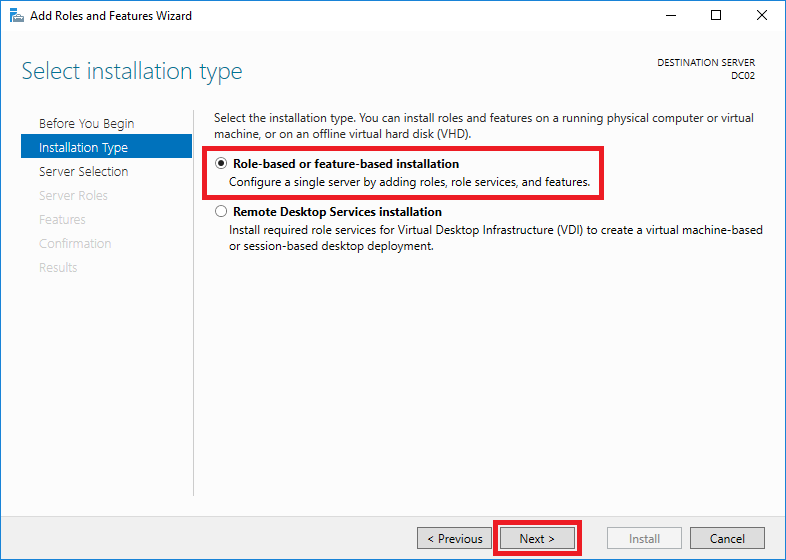
Make sure that Role-based or feature-based installation is selected. Then click Next.
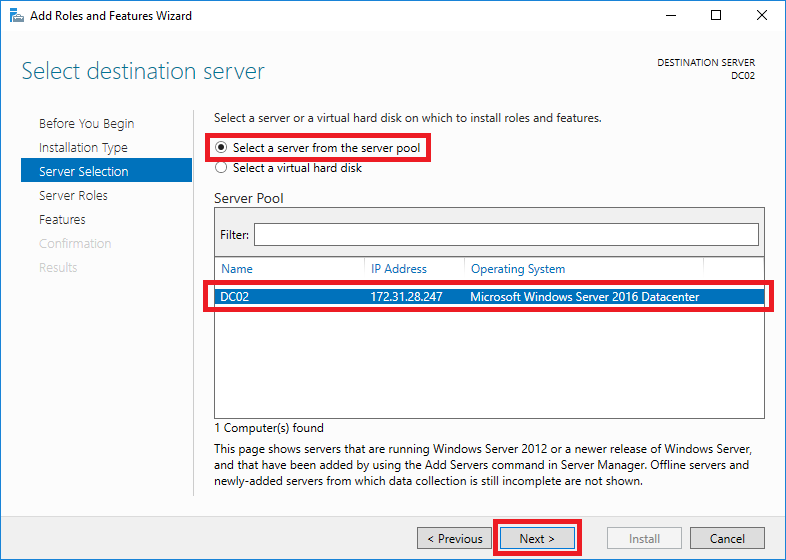
Verify that Select a server from the server pool is selected, and your Secondary Windows Server is selected from the Server Pool list.
Click Next.
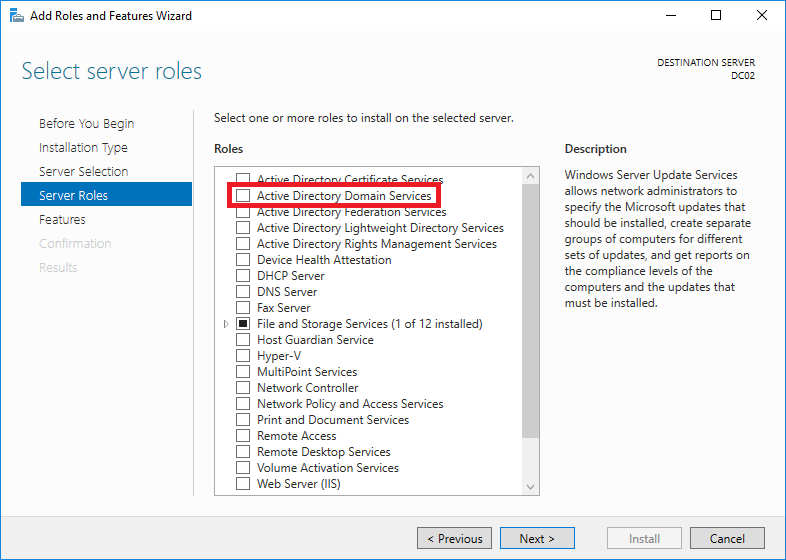
Check Active Directory Domain Services from the list. A window will pop-up.
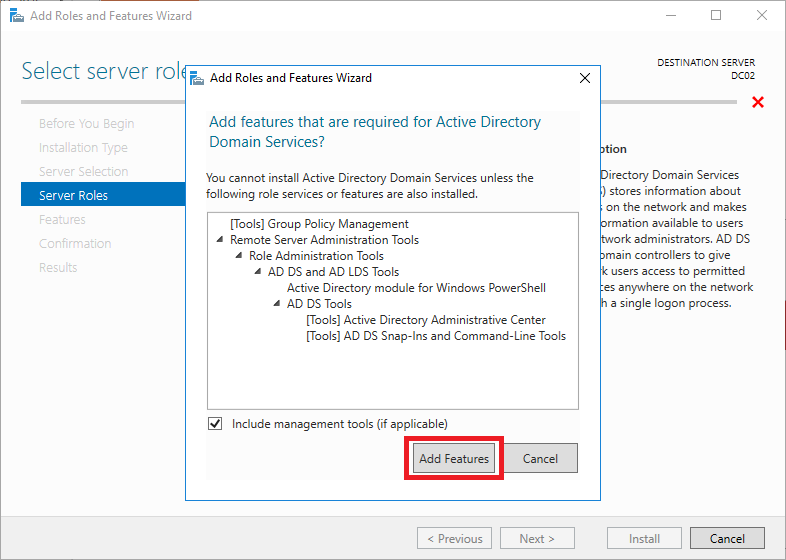
Click on Add Features.
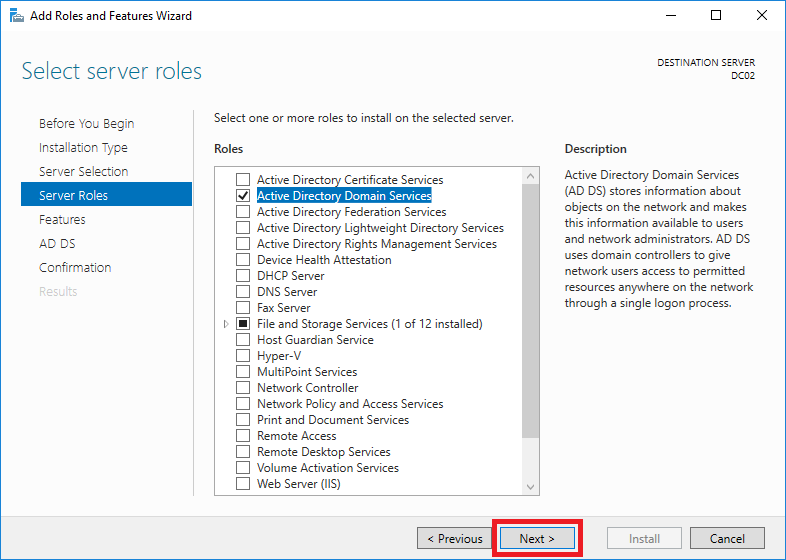
Now that Active Directory Domain Services is checked click Next.
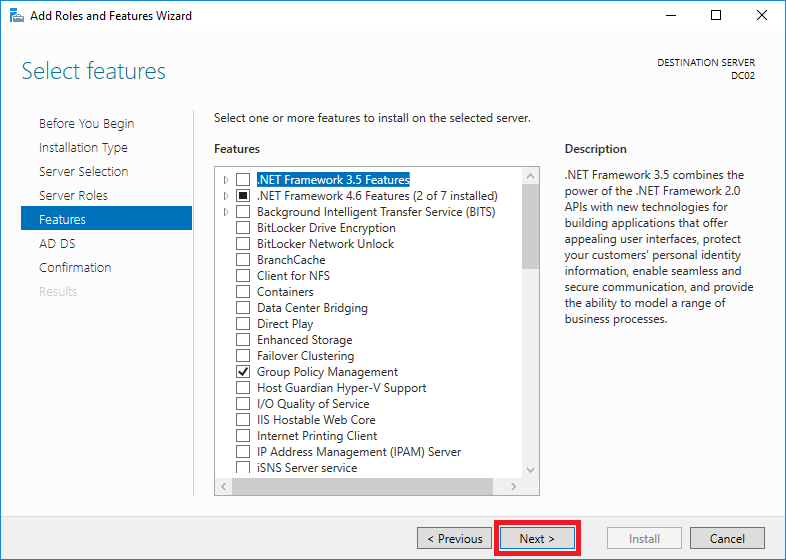
On Select Features just click Next.
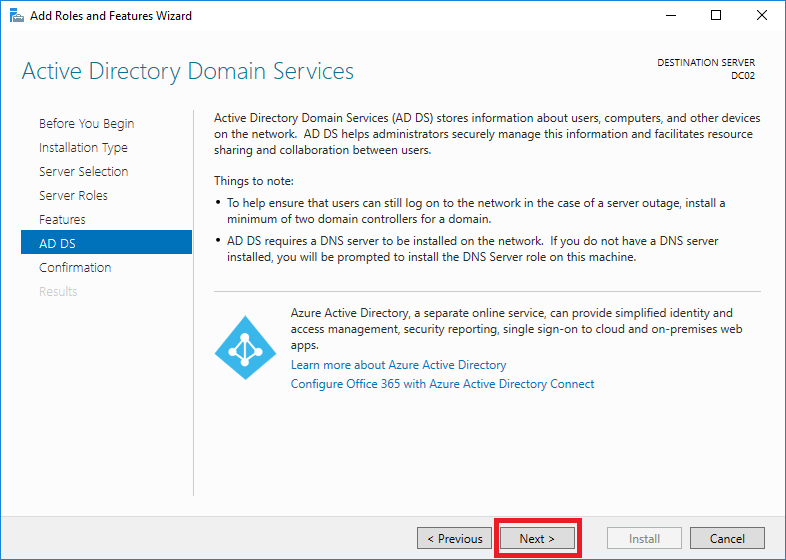
This page will explain what Active Directory is. Just click Next.
Click Install.

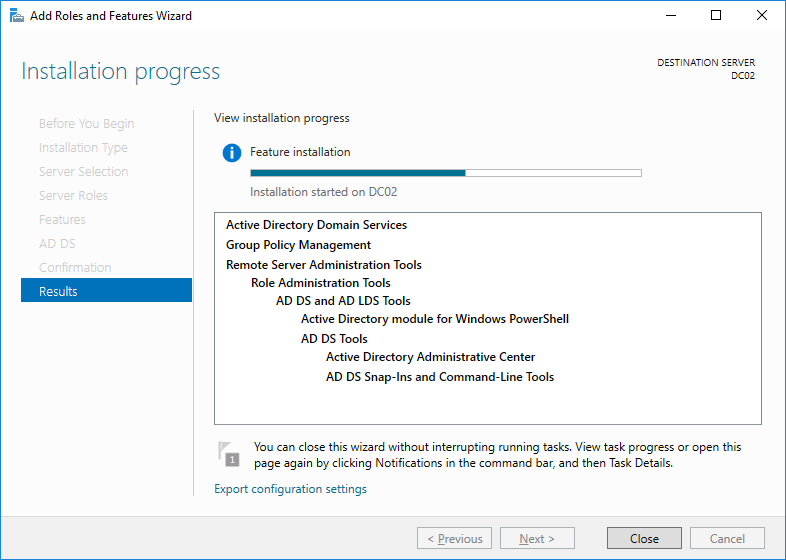
Installation will begin. You can wait around 3-5 minutes.
Once installation has finished the status bar will be full and it will say Configuration required. Installation succeeded on DC02.
Do NOT press Close.
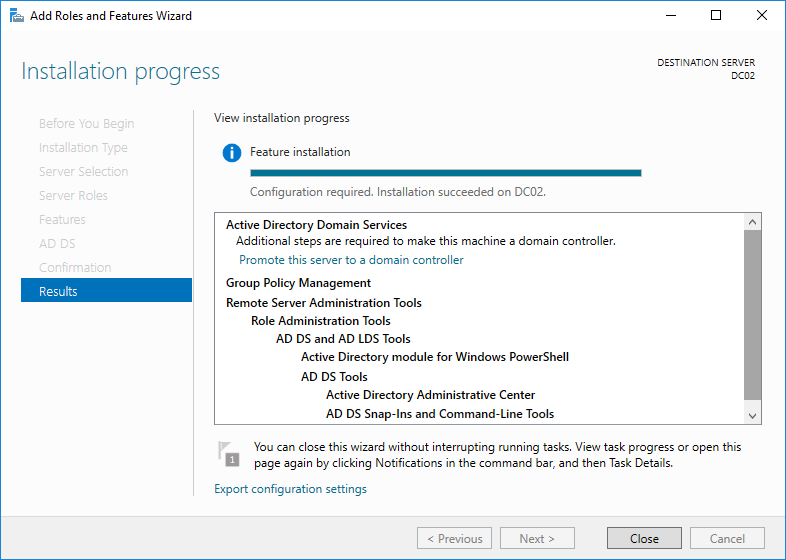
Proceed to the next step.
Secondary: Promote Server to a Domain Controller
This is where it differs from the Primary AD Windows Server since we first have to connect to the Primary and be a member of Active Directory Domain before promoting this to a Domain Controller.
If you did not do the step on Update the DNS Server Address you will have problems doing this.
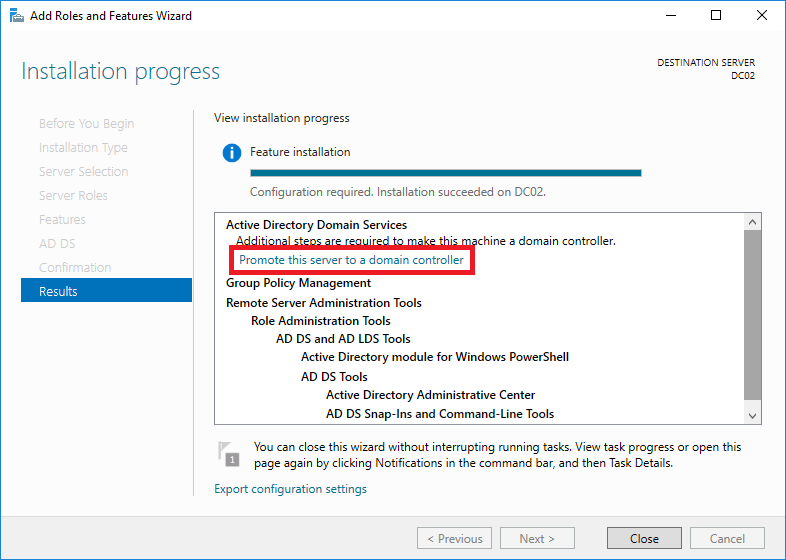
Click on Promote this server to a domain controller. A new windows will pop-up.
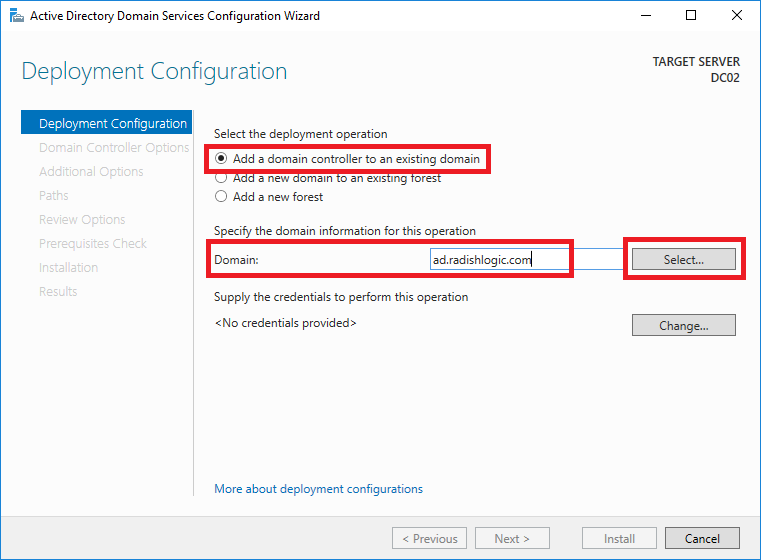
Ensure that Add a domain controller to an existing domain is selected.
Then type the Domain that you chose in your Primary AD Windows Server. In my case the Domain I chose is ad.radishlogic.com. Yours would be different.
Click Select…
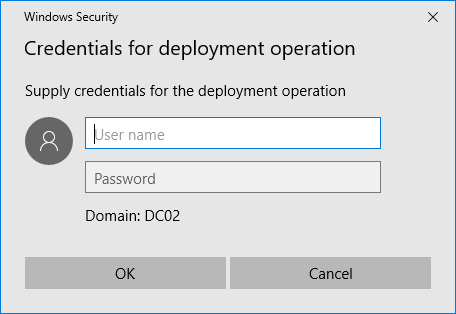
A window will pop up asking for Credentials for deployment operation.
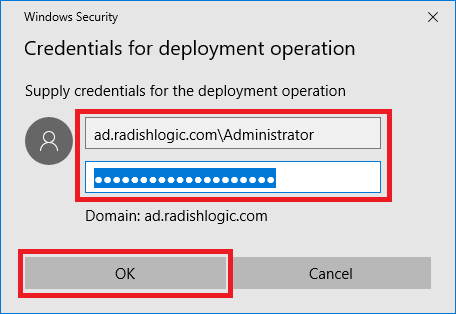
Enter the following values.
- User name: [domain]\Administrator
- Password: your password
Then click OK.
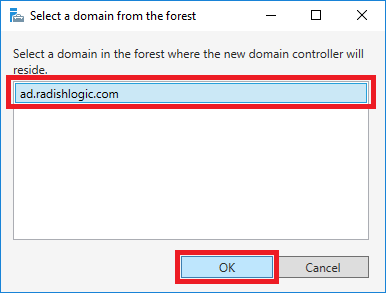
Another window will pop-up. Select your domain and click OK.
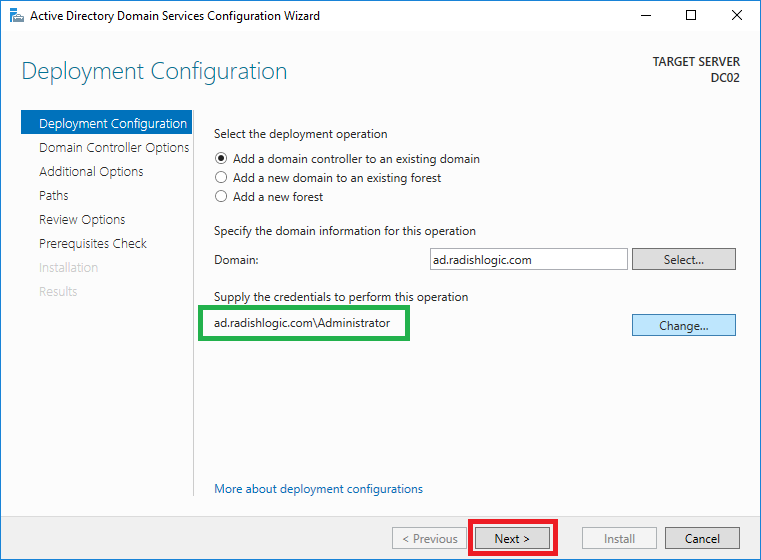
Back at the Deployment Configuration page, you will see your Active Directory Administrator is shown.
Click Next.
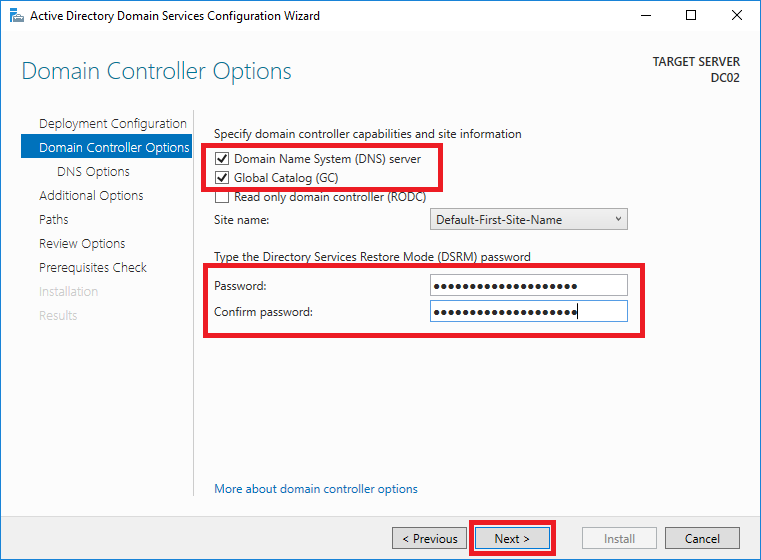
Make sure that the following are checked Domain Name System (DNS) server and Global Catalog (GC).
Create a Directory Services Restore Mode (DSRM) password. I usually have the same DSRM password as the same with the Primary AD Windows Server.
Click Next.
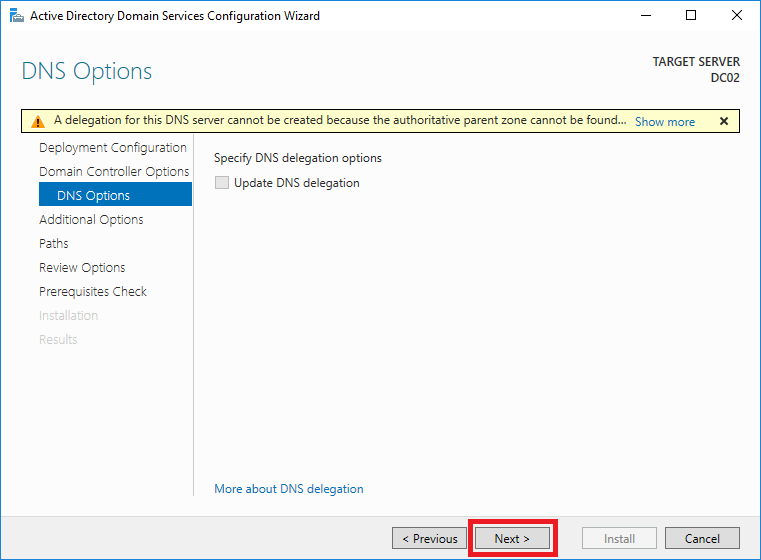
Click Next.
On the Additional Options page, click Next.
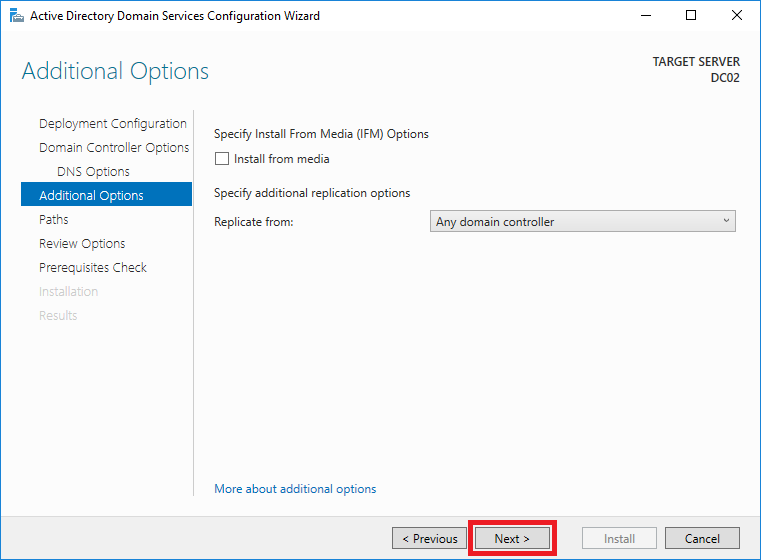
On the Paths page, usually the settings are okay. Click Next.

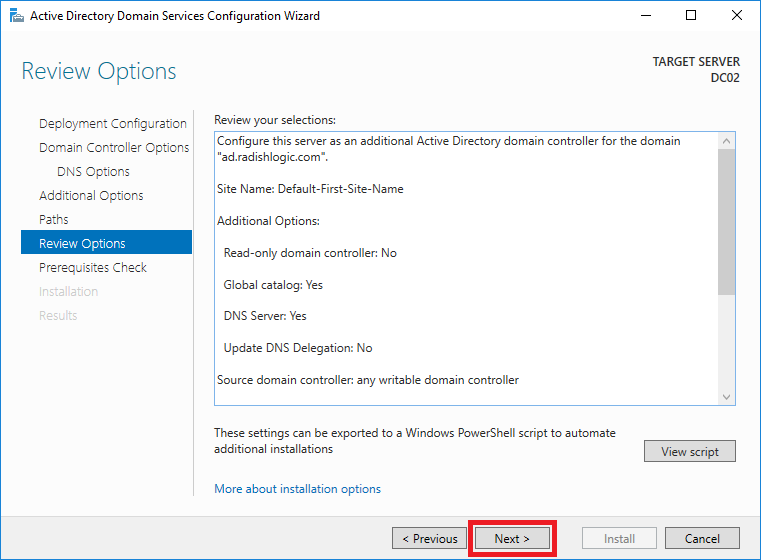
Review the setting, then click Next.
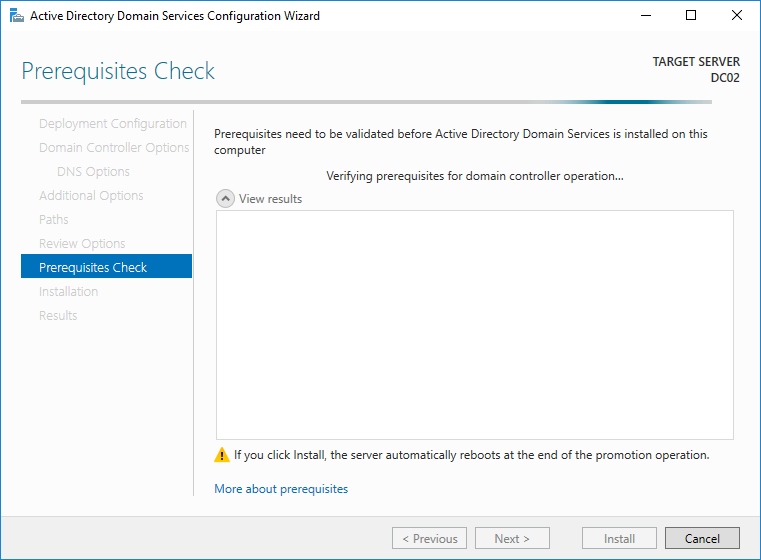
Wait for Prerequisites Check to be done. This will take around 3-5 minutes.
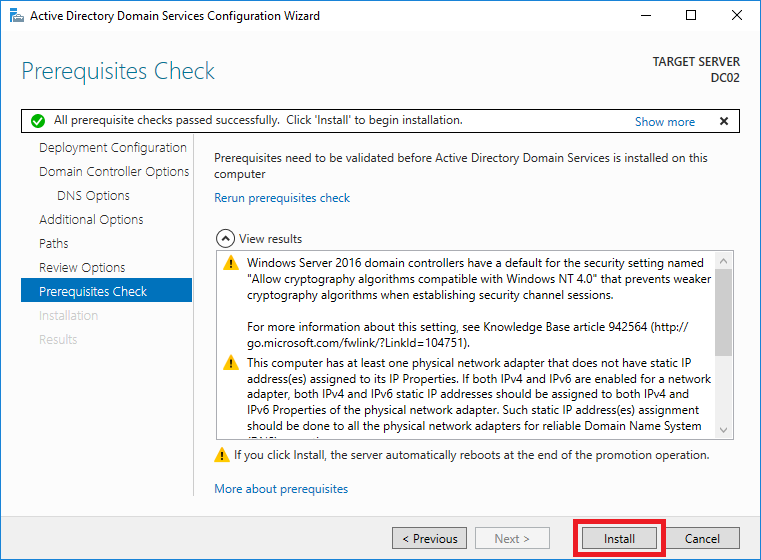
Once prerequisite checks are succesful, click Install.
Installation will take around 5-10 minutes.
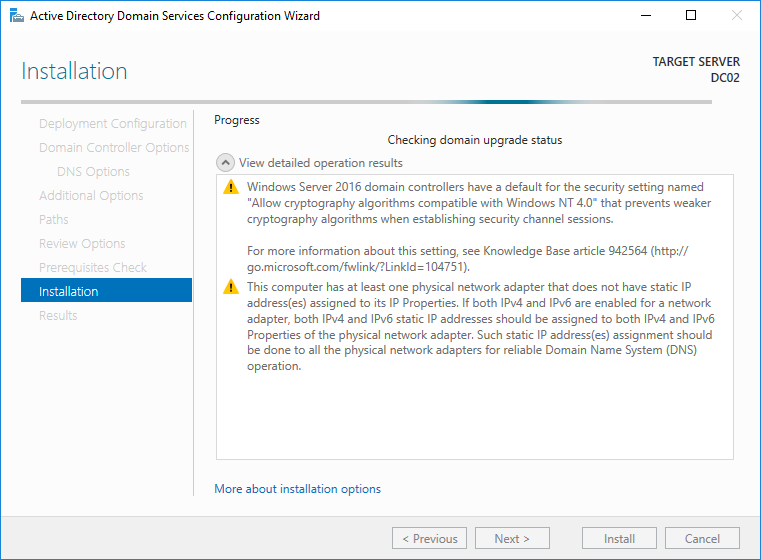
When the installation is finished the blue window will appear warning you that the server will restart.
Just click Close.

The Secondary Windows Server will restart and have done the following
- Succesfully Installed Active Directory Feature
- Joined your Active Directory you setup on the Primary AD Windows Server
- Became a Active Directory Domain Controller
You can follow the testing step below but first we have to complete the necessary step of updating the DNS Server Address of our Primary AD Windows Server.
Secondary: Get the IP Address of the AD Windows Server
Login back to the Secondary AD Windows Server.
Same process of going to the Command Prompt on our Primary AD Windows Server. Same command too, ipconfig.
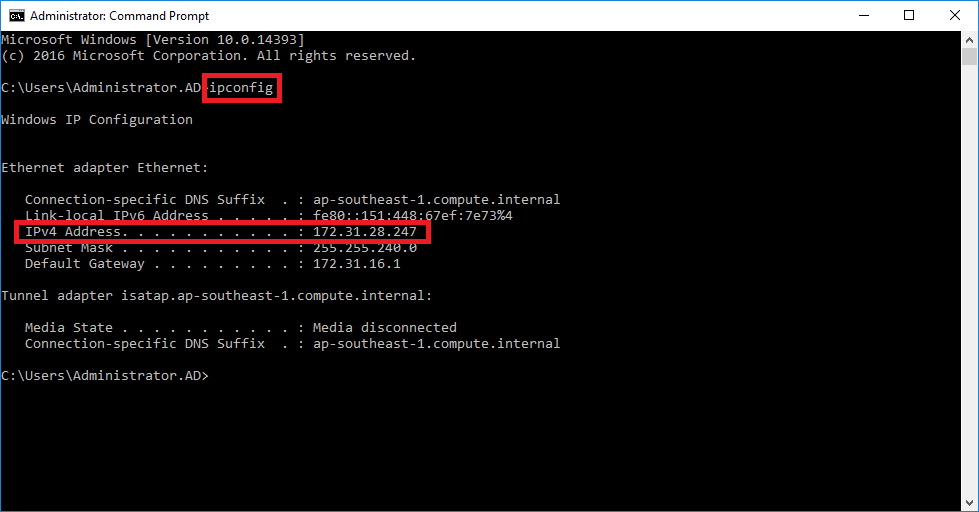
Note the IPv4 Address as you will need this on the Primary.
My Secondary AD Server IPv4 Address is 172.31.28.247. Yours would be different.
Primary: Update the DNS Server Address
Login to the Primary AD Windows Server and open the Internet Protocol Version 4 (TCP/IP) Properties window.
You can do this by following the step Update the DNS Server Address for the Secondary Server.
Select the radio button Use the following DNS server addresses.
Enter the following values.
Preferred DNS server: 127.0.0.1
Alternate DNS server: 172.31.28.247 (IPv4 Address of my Secondary AD Windows Server)
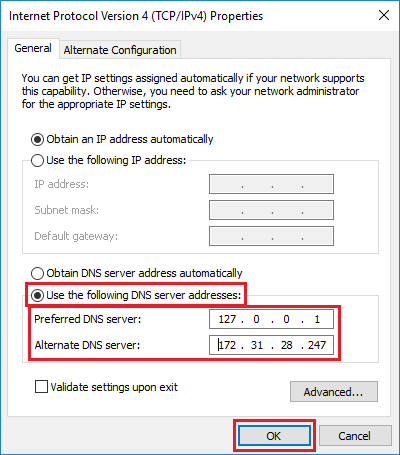
Since this is the Primary AD Windows Server it should first check itself for Domain Controller. If there is a problem with its own Domain Controller then tha is the time it will check our backup Domain Controller which is our Secondary AD Windows Server.
Testing
Secondary: Login using the Active Directory Administrator
Since I am using Amazon Web Services (AWS) EC2 as my virtual machine, to login I need to do it via Remote Desktop Connection (RDP).
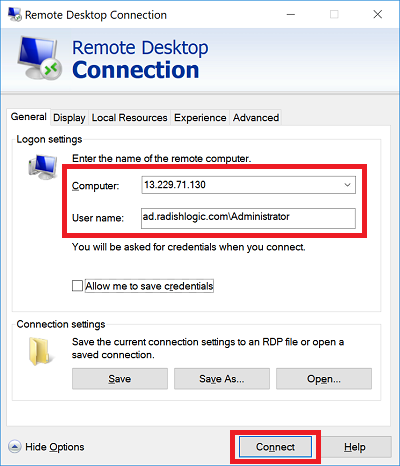
On the application Remote Desktop Connection on windows login using the IP address of your Windows Server and Username as your Active Directory Administrator which you set on the Primary AD Windows Server – [domain]\Administrator.
In my case the following are my values:
- Computer: 13.229.71.130 – current Public IP of my Windows Server on AWS EC2
- User name: ad.radishlogic.com\Administrator
Your values would be different.
Click Connect.
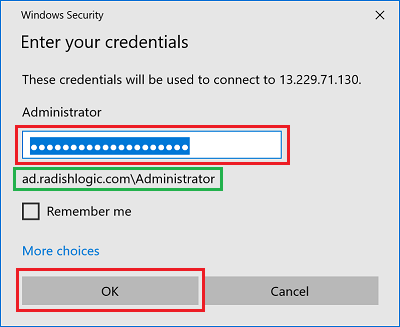
A Windows Security window will pop-up.
Enter the password for your Active Directory Administrator user. Then click OK.
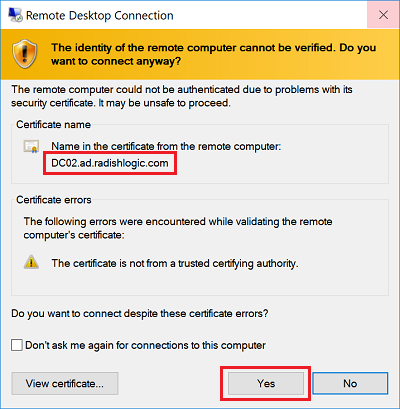
A warning message may pop-up regarding the security certificate. If you notice the Certificate name it says the Full Name of your Secondary AD Windows Server. This verifies that your Secondary AD Windows Server is a member of the Active Directory we setup.
Click Yes.
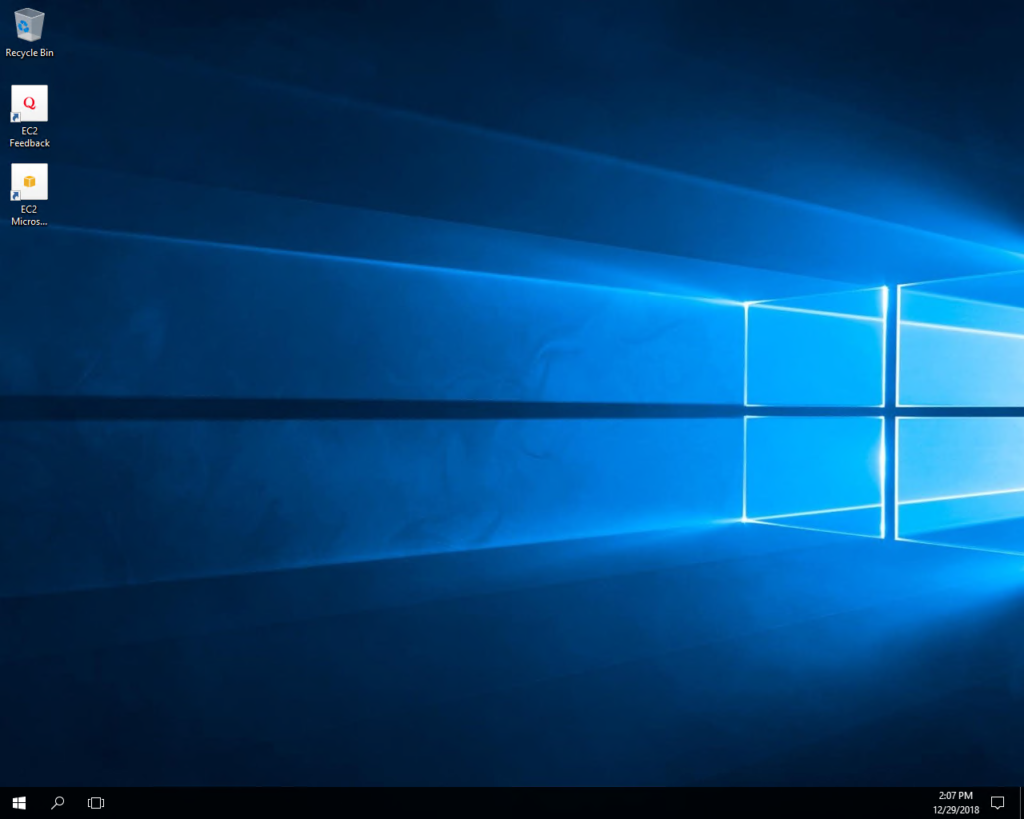
We have now logged in to our Secondary Active Directory Windows Server.
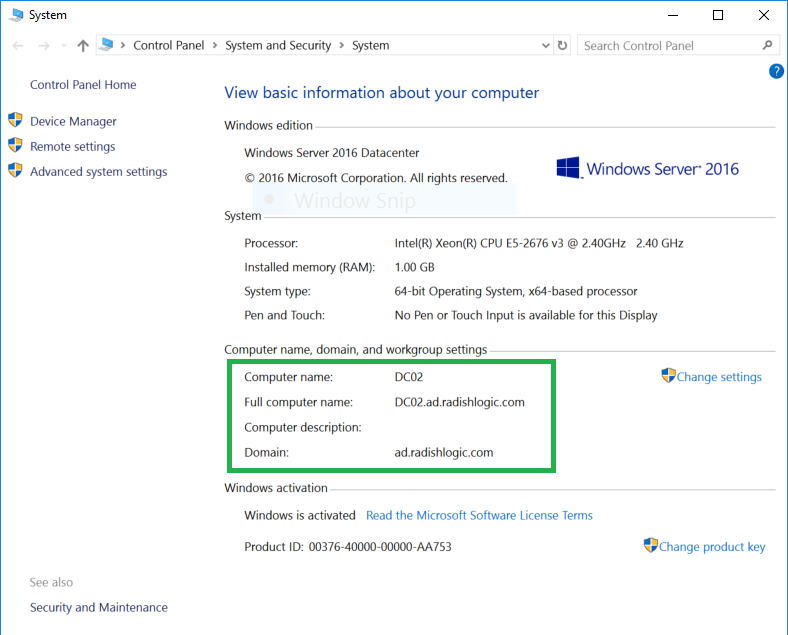
Check the System Information to see that the computer is now a member of the Active Directory Domain.
Secondary: Check Active Directory Users and Computers
Click on the Window-Icon on the bottom-left and then click Server Manager.
![]()
Click on Tools and click on Active Directory Users and Computers from the list.

The Active Directory Users and Computers window will appear.
Double-click on the domain (ad.radishlogic.com) on the sidebar to expand the folder tree. Then click on Domain Controllers.
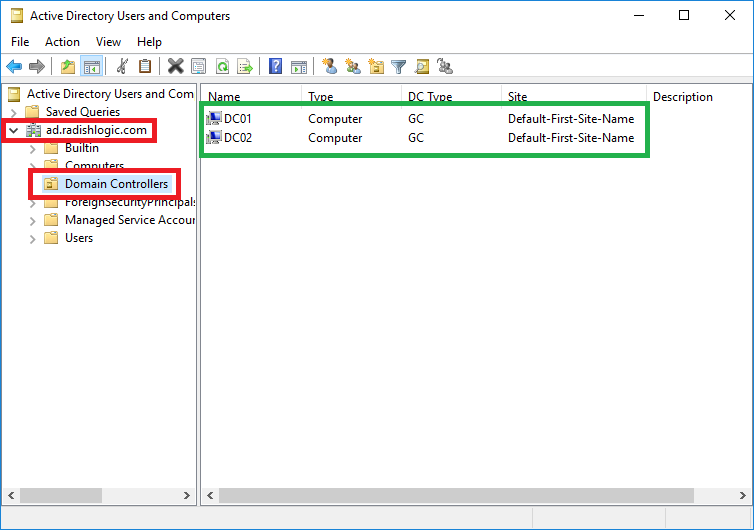
As you can see from the above photo that we now have 2 Domain Controllers. The Primary and Secondary Windows Servers.
Secondary: Check DNS
Click on the Window-Icon on the bottom-left and then click Server Manager.
![]()
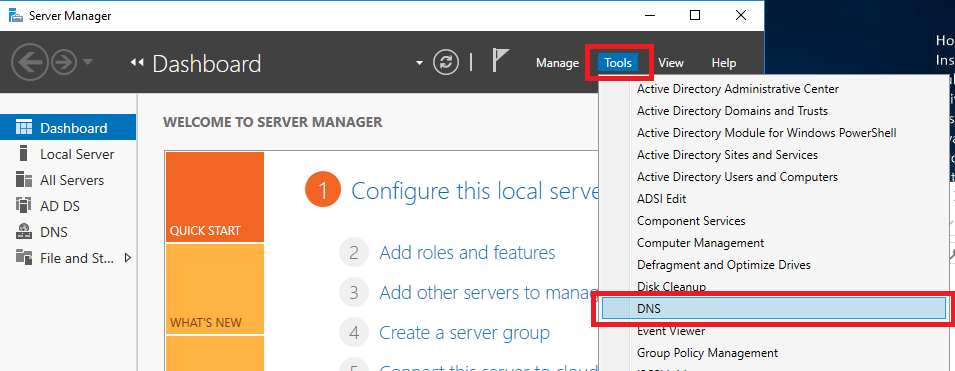
Click on Tools, then DNS.
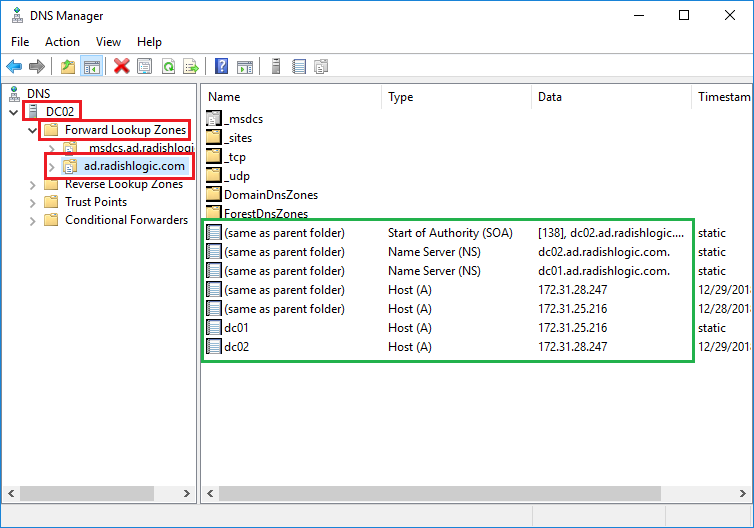
On the DNS Manager window, double-click on the Computer Name (DC02). Then double-click on Forward Lookup Zones, then click on your domain (ad.radishlogic.com).
You will see on the records that your Primary and Secondary AD Windows Server are listed as Name Servers (NS) so they are now responsible for being the DNS Servers on your network.
We have now successfuly setup and checked our Secondary Active Directory Windows Server.
If anything happens with our Primary Server, the Secondary Server will be our back-up.
If you have any questions, comments or corrections on the above steps let me know on the comments below. I would still like to learn more about Windows Active Directory.
Can we set automatically switching when, DC01 down, the user automatically search to DC02.
This is already supported by Active Directory. It’s a master-master setup. Whatevery you do with any Domain Controller will be reflected to the other Domain Controller. So if something happens to DC01, DC02 will automatically take over.
Hi,
I configured the DC02 RODC model. DC02 take control when DC01 down.
hi, thanks for this step-by step instructions. As it was a long time i
I didn’t do it, it was very useful. I have a small problem, I think it’s linked to the DNS, My primary dc has a ip of 10.0.1.6, it’s dns settings are 10.0.1.6 (or 127.0.0.1) and another dns server from my supplier. (213.100.110.120) so I put on my 2nd controller, its ip is 10.0.1.7, i put the DNS 10.0.1.6 and 127.0.0.1 But now I don’t have internet access, i have the yellow mark on the network icon. Any idea ? It’s not that i NEED internet from the second dc, but, it seems odd.
Very good article to set up a secondary Microsoft DC/DNS! Thanks!
Long time since setting up a secondary DC. These instructions made the process very easy. Thank you!
Thank you for this! It was clear and easy to understand.
Thank you so much… was very clear and concise!
Hello Radish,
Did you set static ip address on your primary domain controller
Thank you… was very clear and concise!
Thank you so much, I NEVER would have accomplished setting up our secondary domain controller without these.
Make sure you set your secondary to a static IP address before adding it to the Primary’s DNS records.
Thanks again, now I am off to figure out how to promote the secondary to primary and replace my old primary.
🙂